Local & Remote Demo (Share Without Running a Server)#
This tutorial shows how to export a dataset once and then view/share it without running a long-lived Python server.
You’ll learn two closely-related workflows:
Remote demo (recommended): public GitHub repo
You push an
exports/folder to a public GitHub repo.Anyone can open Cellucid and load your dataset from that repo.
Local demo (optional): run the web app locally
You put your exported dataset inside a local copy of the Cellucid web app.
You run a simple static file server (or just a local host).
This is useful for offline demos or if you want to host Cellucid yourself.
If you just want to load your own local files right now, use Browser File Picker (No Python Setup). For a complete, inspectable public repository with three tiny datasets, use Publish a Custom Dataset Repository.
At A Glance#
Audience
Wet lab / beginner: follow the step-by-step checklist; you do not need to understand file formats.
Computational users: pay attention to dataset IDs, compression/quantization, and GitHub limits.
Developers: this explains the exact directory structure (
datasets.json+dataset_identity.json) used by the frontend.
Time
Minimum viable share (one dataset, public repo): ~15–30 minutes (mostly uploading)
Adding multiple datasets + polish: ~30–60 minutes
Prerequisites
Python environment with
cellucidinstalledA dataset in one of these forms:
AnnData object (
adata)a
.h5adfilea
.zarrdirectory
(For remote demo) a GitHub account + willingness to publish a public repo
Important: Privacy and Sharing#
When you publish exports to a public GitHub repo, you are effectively publishing your dataset.
Before you do this:
Verify there is no private metadata in
obs(e.g. patient IDs, sample identifiers, internal notes).Consider removing/renaming columns that should not be public.
Consider publishing only a reduced dataset or a subset of fields.
If you need private sharing:
Use Server Mode (Server Mode (CLI + Python)) on a private machine + VPN/SSH tunnel.
Or use the Browser File Picker on each collaborator’s machine.
The Required Folder Layout (Do This Exactly)#
Cellucid’s GitHub loader expects a top-level datasets.json manifest plus one folder per dataset.
Recommended layout:
exports/                     # "exports root" (this is what you point Cellucid at)
├── datasets.json            # required
├── pbmc_demo/               # dataset folder (name can differ from dataset_id)
│   ├── dataset_identity.json
│   ├── points_2d.bin.gz
│   ├── points_3d.bin.gz
│   ├── obs_manifest.json
│   ├── var_manifest.json
│   ├── obs/
│   ├── var/
│   ├── vectors/             # optional (vector fields like velocity/drift)
│   └── connectivity/        # optional
└── another_dataset/
    └── ...
Key rules
datasets.jsonis at the exports root, not inside the dataset folder.Each dataset folder must contain a
dataset_identity.json.All paths in
datasets.jsonare relative to the exports root.
Step 1 — Export Your Dataset (Create the Dataset Folder)#
You can export from:
an in-memory
AnnData(adata)a
.h5adfilea
.zarrdirectory
The central idea:
You create one dataset folder, e.g.
./exports/pbmc_demo/.That folder is what Cellucid will actually fetch.
from __future__ import annotations

from pathlib import Path

from cellucid import prepare

export_dir = Path("./exports/pbmc_demo")

prepare(
    latent_space=adata.obsm["X_pca"],
    obs=adata.obs,
    var=adata.var,
    gene_expression=adata.X,
    connectivities=adata.obsp["connectivities"],
    X_umap_1d=adata.obsm["X_umap_1d"],
    X_umap_2d=adata.obsm["X_umap_2d"],
    X_umap_3d=adata.obsm["X_umap_3d"],
    vector_fields={
        "velocity_umap_1d": adata.obsm["velocity_umap_1d"],
        "velocity_umap_2d": adata.obsm["velocity_umap_2d"],
        "velocity_umap_3d": adata.obsm["velocity_umap_3d"],
    },
    vector_field_default="velocity_umap",
    out_dir=export_dir,
    dataset_id="pbmc_demo",
    dataset_name="PBMC demo",
    dataset_description="PBMC scRNA-seq with aligned velocity",
    obs_categorical_dtype="uint16",
    compression=6,
    var_quantization=8,
    obs_continuous_quantization=8,
)
This complete call assumes adata contains every named matrix. The executable
Prepare a real Pancreas dataset for Cellucid notebook
deliberately exports only the checked-in source file’s real 2-D UMAP and
connectivity; it does not invent 1-D/3-D coordinates or velocity. For the full
standard Pancreas artifact with deterministic 1-D, 2-D, and 3-D embeddings and
aligned velocity, use Standard Pancreas sample dataset and the reproducible
Vector fields and velocity overlay end-to-end
workflow. For a dataset without a particular optional product, omit that
product deliberately—for example, omit both X_umap_3d and
velocity_umap_3d rather than inventing a third coordinate or passing None.
Export knobs you should understand (even as a beginner)#
dataset_id:A stable identifier that will appear in URLs and manifests.
Avoid changing it after you publish.
See Dataset identity (why it matters) for what breaks when it changes.
dataset_name/dataset_description:Human-friendly labels shown in the UI.
compression(gzip level):Higher = smaller files, slower export.
A good starting point is
compression=6.
var_quantizationandobs_continuous_quantization:Controls how values are compressed/quantized.
Smaller bit-depth makes exports much smaller but loses precision.
For visualization,
8is often a good default.
vector_fields(optional):Per-cell displacement vectors visualized by the vector field / velocity overlay.
Must be provided per-dimension (
*_umap_2d,*_umap_3d) and match the same cell order as the embedding.If you export them, you’ll see a vector-field dropdown in the UI after loading.
See Vector Field / Velocity Overlay (GPU Particle Overlay) for naming and UI controls.
If you want the full, parameter-by-parameter specification, see the Python package guide section:
Step 2 — Generate datasets.json (Create the Exports Manifest)#
Once you have one (or many) dataset folders under ./exports/, generate datasets.json.
This file is required for the GitHub loader.
from __future__ import annotations

from cellucid.prepare_data import generate_datasets_manifest

# This scans ./exports/*/dataset_identity.json
# and writes ./exports/datasets.json
generate_datasets_manifest("./exports", default_dataset="pbmc_demo")
Step 3 — Validate Locally (Before You Upload)#
Before publishing, verify that your export loads:
Fastest validation: open Cellucid and use the Prepared file picker (Option #3).
Most realistic validation: run the CLI server (Option #6) and open the exact printed prepared-data Viewer URL (
http://127.0.0.1:<port>/?source=remote).
This avoids debugging “GitHub problems” that are actually export problems.
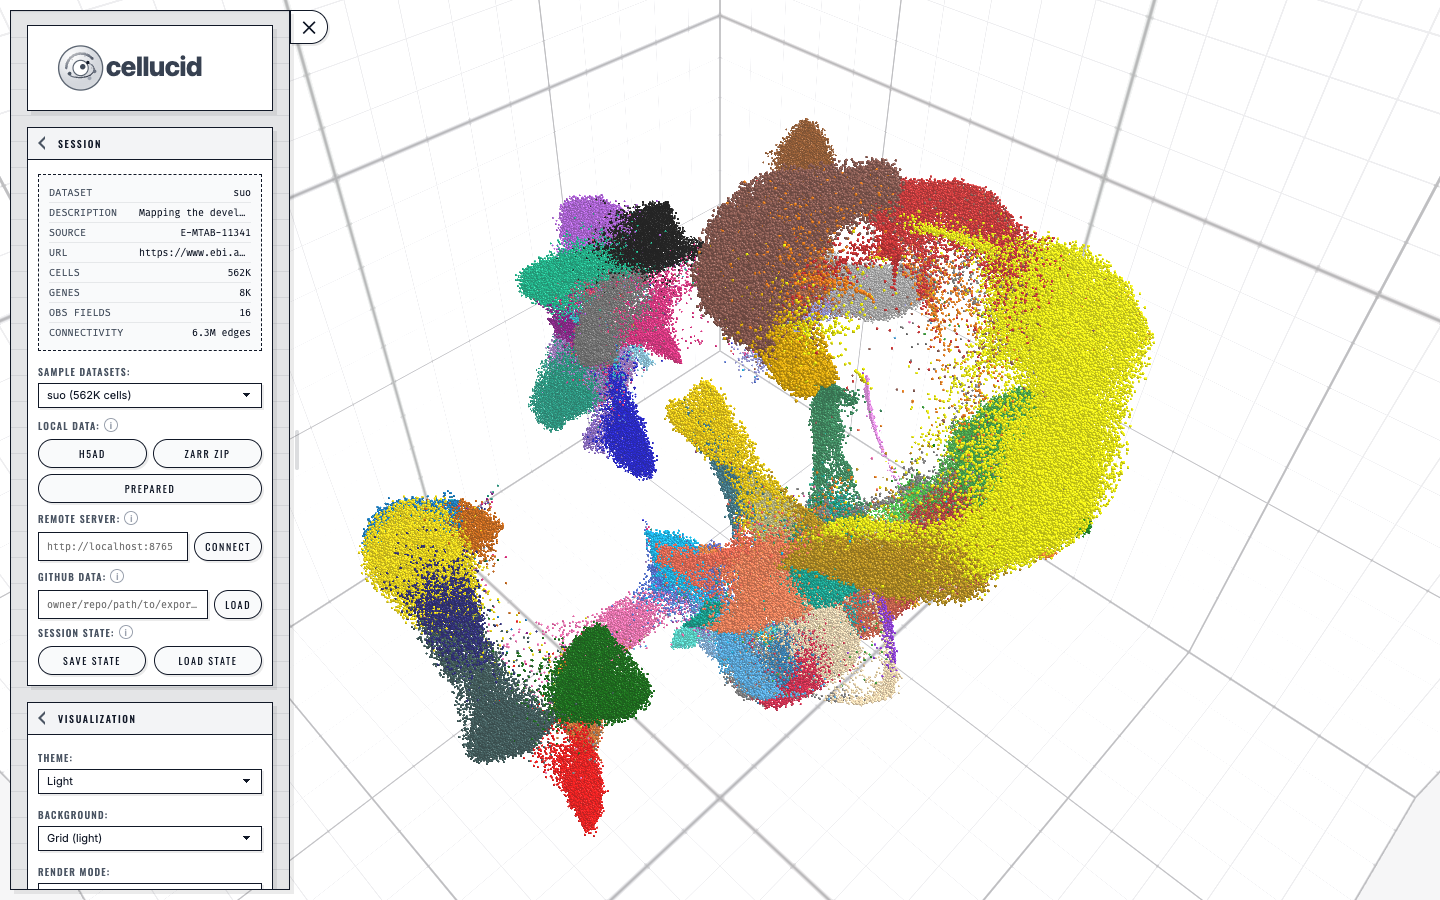
A loaded dataset in Cellucid: the sidebar controls the active view while the categorical legend maps directly to the colored points.#
Step 4 — Publish to a Public GitHub Repo (Remote Demo)#
4.1 Create a repository#
You can use either:
a repo that contains only data (recommended), e.g.
my-lab/cellucid-exportsa general repo that contains code + an
exports/folder
4.2 Commit the exports root#
The repo must include:
exports/datasets.jsonat least one dataset folder under
exports/
4.3 GitHub constraints (do not skip)#
Public repo only: Cellucid’s GitHub loader fetches data via
raw.githubusercontent.com.Branches:
Shorthand without a branch always means
main; Cellucid does not probe other branch names.If your exports live on a different branch, name it explicitly:
owner/repo@my-branch/exportsor
https://github.com/owner/repo/tree/my-branch/exports
File size limits:
GitHub blocks ordinary Git files larger than 100 MiB.
Git LFS raw repository content is a pointer, not a transparent replacement for the prepared bytes Cellucid requests.
If your export is too large for GitHub:
Use Server Mode instead (Server Mode (CLI + Python)).
4.4 What repo path to enter in Cellucid#
In the Cellucid UI (GitHub connection), you will enter one of these:
owner/repo(ifdatasets.jsonis at repo root)owner/repo/exports(if your exports root is in a folder)owner/repo@my-branch/exports(if your exports root is on a custom branch)
Cellucid will then:
fetch and validate
datasets.jsonfetch and validate every listed
dataset_identity.jsonshow the validated dataset list
fetch the selected dataset’s remaining files on demand
Shareable URL
Once it works, share the exact dataset. The dataset= field is required when
the catalog contains multiple datasets:
https://www.cellucid.com/?github=owner/repo/exports&dataset=pbmc_demo
(Replace owner/repo/exports with your chosen path.)
Optional: “Local Demo” (Run the Web App Locally With Demo Exports)#
The web app’s local-demo source loads from an exports base URL (it does not have to be inside the web app repo).
In production, Cellucid’s sample datasets are intended to live in a separate repository/site (e.g. cellucid-datasets) and the web app is configured via:
<meta name="cellucid-exports-base-url" content="...">incellucid/index.html, or?exportsBaseUrl=...as a runtime override.
High-level local-dev workflow:
Run the web app locally.
Point
exportsBaseUrlat any static host that servesexports/datasets.json+ dataset folders.
Note
If your exports host is a different origin, it must authorize the Cellucid origin with CORS headers so the browser can fetch the JSON and binary files. There is no alternate browser-side transport for a host that rejects the cross-origin requests.
Edge Cases#
Changed dataset IDs after publishing: links break; collaborators load the wrong dataset.
Missing
datasets.json: GitHub loader cannot discover datasets.Wrong repo path: the loader fetches
datasets.jsonfrom the wrong folder (404).Wrong branch: your exports root is on a different branch than you think (pin the branch in the repo path).
Large files: GitHub may reject pushes, or raw fetch may be blocked by a corporate proxy.
Vector fields “missing” after publish:
You didn’t export them (no
vectors/directory and novector_fieldsblock indataset_identity.json).Or you exported only 2D vectors but you are viewing the dataset in 3D (dimension mismatch).
Troubleshooting (Large, Practical)#
Use this section like a lookup table.
Symptom: “Connected to GitHub, but it says datasets.json not found”#
Likely causes (ordered)
Your repo path points at the wrong folder.
You uploaded only a single dataset folder and forgot
datasets.json.Your exports root is in a different branch than you think.
How to confirm
Open this URL in a browser (replace values):
https://raw.githubusercontent.com/<owner>/<repo>/<branch>/<path>/datasets.json
If that URL 404s, Cellucid will also fail.
Fix
Regenerate
datasets.jsonwith an explicit catalog default:generate_datasets_manifest( "./exports", default_dataset="pbmc_demo", )
Ensure the file is at the exports root you are pointing Cellucid at.
Prevention
Keep a single exports root folder named
exports/in your repo.Always validate the raw URL before sending the link to collaborators.
Symptom: “Datasets list shows up, but loading a dataset fails (404 for a file)”#
Likely causes
datasets.jsonlists a datasetpaththat does not exist.You renamed the dataset folder after generating the manifest.
How to confirm
Compare
datasets.json["datasets"][i]["path"]to the actual repo folder names.
Fix
Re-run
generate_datasets_manifestafter renaming folders.
Symptom: “It loads, but gene search is extremely slow”#
Likely causes
Export not compressed/quantized (files too large)
Using
.h5adbrowser mode (not an export)Huge dataset where each gene vector is large even after compression
Fix
Re-export with
compression=6andvar_quantization=8.Prefer server mode for very large datasets.
Symptom: “The vector field overlay toggle is disabled / no fields appear”#
Likely causes
You didn’t export any vector fields (common).
Vector fields exist, but the naming convention is wrong (so they aren’t detected).
You exported only 2D vectors but you are looking at a 3D embedding (or vice versa).
How to confirm
Open
exports/<dataset>/dataset_identity.jsonand check for avector_fieldsblock.Confirm the repo contains a
vectors/folder with files like:vectors/<fieldId>_2d.bin.gz vectors/<fieldId>_3d.bin.gz
Fix
Re-export with
prepare(..., vector_fields={...})using the*_umap_2d/*_umap_3dnaming convention.Make sure you commit/publish the
vectors/directory.Switch the viewer to the dimension that actually has vectors.
For UI behavior and overlay-specific debugging, see:
Symptom: “GitHub blocks my push / files are too big”#
Likely causes
Individual files > 100 MB
Total repo size becomes too large
Fix
Reduce export size (quantization, fewer genes/fields).
Switch to server mode.
Host exports elsewhere and load via a server.
Next Steps#
Want to load from your computer (no publishing)? → Browser File Picker (No Python Setup)
Want a complete repository to copy and adapt? → Publish a Custom Dataset Repository
Want the most reliable workflow for big datasets? → Server Mode (CLI + Python)
Export format expectations: Folder / file format expectations (high-level; link to spec)
If GitHub loading fails: Troubleshooting (data loading)