
Save/restore UX (manual save + restore)#
Audience: everyone (wet lab + computational)
Time: 10–20 minutes
What you’ll learn:
Where the session controls live in the UI
The exact steps to Save State and Load State
How to confirm the one complete restore outcome
Best practices for naming, organizing, and sharing session files
Prerequisites:
A dataset loaded in the web app
Where the session controls live#
In the left sidebar:
Open User data (the accordion that also contains dataset loading controls).
Find the block labeled Session state.
Use:
Save State (downloads a
.cellucid-sessionfile)Load State (opens a file picker and restores a
.cellucid-sessionfile)
Fast path (wet lab / non-technical): “save my work”#
Save State#
Click Save State.
Wait for a “Session saved successfully” notification.
Find the downloaded file in your browser’s downloads.
It will end in
.cellucid-session.The default name includes a timestamp (so files don’t overwrite each other).
Load State#
Load the same dataset first.
Click Load State.
Choose the
.cellucid-sessionfile.Wait for the download progress to finish with Session fully restored and for the panel status to say Session loaded successfully.
If the view already matched the file, the visual change may be subtle; use the checks below.
Note
This file-picker workflow is for a state you or a collaborator saved. Official built-in samples are different: their catalog-advertised, integrity-verified static starting state applies automatically after the scientific dataset is published. See Official sample starting states.
The catalog’s internal default.cellucid-session is not an ordinary manual
bundle. If you download it and choose Load State, the strict manual loader
rejects its intentionally smaller five-chunk profile. Choose the sample and
then use Save State to create a portable manual bundle.
Practical path (computational): what happens under the hood#
Save State is a file download#
When you click Save State:
Cellucid captures state from multiple subsystems (camera, filters, highlights, etc.).
It writes a single-file bundle and triggers a browser download.
There is no server upload by default.
Load State is ordered and atomic#
When you click Load State and pick a file:
Cellucid validates the whole container, current chunk inventory, exact dataset fingerprint, and declared byte bounds.
Eager chunks run before dependent lazy chunks.
The loader waits for large highlight memberships, analysis artifacts, and inactive user-defined codes too.
All feature owners prepare and commit, then the final UI refreshes.
Only then does the operation report success.
The scheduler yields between heavy chunks to keep Cancel and newer loads responsive. Eager is not a partial-success boundary: a failure in any later chunk rolls back earlier state.
How to confirm a restore worked (quick checklist)#
After loading:
Look for a session notification:
require Session fully restored, followed by the panel’s Session loaded successfully status.
If the operation was rejected, read the exact error.
A dataset mismatch rejects everything; see Current format and dataset identity.
Confirm the high-signal state after success:
active field (Coloring & Filtering section)
Active filters panel (should match what you remember)
snapshot layout (grid vs single)
Camera Path and playback state
highlight memberships and analysis windows
If you press Cancel or start a newer restore, the older progress is dismissed. That intentional cancellation is neither success nor a product failure.
If anything is off, jump to Troubleshooting sessions.
Best practices (these save you hours later)#
1) Treat the dataset + session as a pair#
Because sessions do not contain the dataset:
store the
.cellucid-sessionfile next to the dataset export folder,or store a clear pointer to where the dataset is hosted (URL/GitHub path).
2) Use a naming convention that encodes intent#
Recommended naming format:
<dataset>__<goal>__<who>__<YYYY-MM-DD>__v<N>.cellucid-session
Examples:
pbmc_demo__qc-filtered__kelly__2025-12-30__v1.cellucid-sessionsuo__figure1_candidate__team__2025-12-30__v3.cellucid-session
Why:
session files are binary; the filename is your metadata unless you add a separate README.
3) Save “milestones”, not every minute#
Sessions can become large when they include:
many highlight groups with huge memberships,
many user-defined categorical fields,
analysis caches.
Save milestones like:
“after QC filters + first labeling”
“after final highlight pages”
“before figure export settings”
4) Save before you load someone else’s session#
Loading is destructive to the current UI state.
Workflow:
Save your current session.
Load the other session.
If needed, switch back by loading your saved session.
Interface reference#
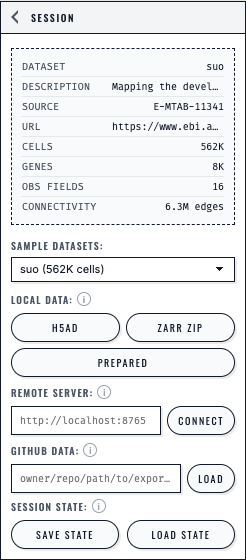
The Session panel presents each loading path separately and keeps Save State and Load State beside the dataset controls.#
Next steps#
Official sample starting states (understand automatic, integrity-verified static starting states for official samples)
Share workflows (links vs bundles vs exports) (how to send sessions to humans safely)