
Data Loading in the Web App (All Paths)#
These pages cover every current route into Cellucid: public samples, prepared folders, browser-selected H5AD or Zarr ZIP files, local or remote Python servers, Jupyter, and public GitHub catalogs.
They are written for mixed audiences:
Wet lab / non-technical: click-by-click, “what success looks like”, and safe defaults.
Computational users: formats, performance tradeoffs, parameter choices, and reproducibility.
Power users / developers: edge cases, failure modes, and how to debug loading issues.
Important
If you are not sure which method to use, start with Data Loading Overview (All 14 Options).
Note
Vector fields (velocity/drift overlays): if your dataset includes per-cell vectors, Cellucid can visualize them as an animated overlay after loading. You don’t need a special loading method—just make sure the vector field data is present and named correctly. See Vector Field / Velocity Overlay (GPU Particle Overlay) and Folder / file format expectations (high-level; link to spec).
Fast Path (Choose Your Workflow)#
Use this as a decision tree. You can always switch later.
You have… |
Best first choice |
Why |
Next page |
|---|---|---|---|
A pre-exported folder from |
Browser Prepared picker |
Fastest, most reliable, no server |
|
A portable |
Browser Zarr ZIP picker |
One validated file selection in every supported browser |
|
A |
Server mode (recommended) or Jupyter |
Python opens the file read-only-backed, reducing matrix memory pressure |
|
A |
Server mode or Jupyter |
Direct Python loading is supported and eager |
|
An in-memory |
Jupyter |
Fastest way to iterate while analyzing |
|
A dataset collection you want to share publicly |
GitHub-hosted exports |
Exact shareable URLs, no running server |
|
Interface reference#
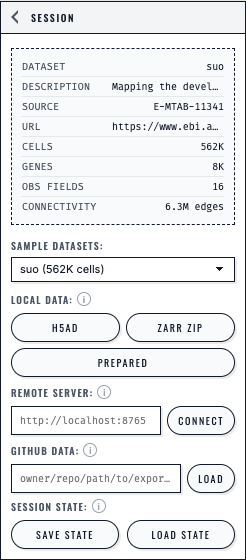
The Session panel presents each loading path separately and keeps Save State and Load State beside the dataset controls.#
Note
The Session panel keeps every loading action and connection state visible.
Its compact i buttons only open explanatory help: click one, or focus it with
Tab and press Enter or Space. Press Escape, click
elsewhere, or move focus outside to close it. See
UI glossary (terminology) and
Accessibility.
Getting Started#
Understand all 14 loading options and choose the best approach for your workflow: in-memory, h5ad, zarr, or pre-exported.
Export once, then share via public GitHub-hosted exports (no server), or run a local demo viewer.
Follow a complete three-dataset reference repository, validate its exact catalog contract, and publish stable dataset-specific links.
Load the scVelo pancreas sample and verify its 1D/2D/3D embeddings, dimension-matched velocity, metadata, genes, connectivity, and provenance.
Viewing Methods#
Load a prepared directory, one H5AD file, or one portable Zarr ZIP through the three visible local-data controls.
Run a local HTTP server for larger datasets with efficient lazy loading of gene expression.
Visualize AnnData objects directly within Jupyter notebooks with embedded interactive widgets.
Concepts & Troubleshooting#
What makes a dataset “the same dataset” in Cellucid, and why it matters for sessions, sharing, and community annotation.
What files/keys are required for exports, GitHub manifests, .h5ad, and .zarr.
Symptom → diagnosis → fix for file picker, server mode, GitHub exports, and common data issues.
Current loading controls, a successful direct H5AD load, and browser-engine acceptance captures.
If your dataset includes vector fields (e.g. RNA velocity), enable the overlay after loading and pick a field for the current dimension.
Quick Comparison#
Method |
Best For |
Separate server command? |
|---|---|---|
Public sample |
Learning with known-good data |
No |
Browser file picker |
Local viewing without Python |
No |
GitHub catalog |
Public, dataset-specific share links |
No |
Server mode |
Large data and on-demand browser gene requests |
Yes — |
Jupyter |
Interactive analysis workflows |
No — the viewer manages a localhost server |
Note
Server mode and Jupyter both use HTTP internally. The distinction above is
whether you start a separate terminal command. Both bind to 127.0.0.1 by
default; use the documented SSH-tunnel workflow for a remote machine.